I can't express how excited I am that you found this site, this place - my place.
I hope you get a bit of enjoyment and a smile comes to your face when you read my posts and look at my work. Enjoy -

Saturday, March 24, 2012

Tags, Bags, Boxes, and More 2

Hi, fellow paper people!  Just thought I'd share a project that I worked on this weekend. 

With Easter coming soon, I thought I'd make a couple of "Easter baskets" for my son and his pooch, Doobie.  I'd been dying to try TBBM2 so this was the perfect time!  That first cut was just calling to me, so how could I refuse?

This cartridge is different than the other ones.  You really need to buy the scoring housing to use with this cartridge.  While I've heard of others trying to turn the blade upside down and the housing upside down, using the correct scoring tool works best, in my opinion.

Okay, let me give you some quick tips first.  Put the scoring housing in your machine first, before you load the paper.  Make sure you press the shift key and score the paper first.  I had my scoring "blade" set to 6, pressure = full, and speed = full.  Now, (and this is VERY important) when the scoring is finished, leave the mat alone and change the housing back to the blade housing without moving the carriage.  After you have changed out the housing, THEN press "Load Paper" and the mat will be taken back to the beginning of the paper.  Make sure that the Paper Saver button is NOT on.  It could cause a misalignment of the cut and scoring.


Do you like Doobie's "basket"?  I plan to put Easter grass inside with dog treats.  WARNING: This was cut using "Fit to Page" and put together using two pieces.  It came out to 11 inches on the mat.  I used My Mind's Eye paper titled "Union Square - Home Sweet Home - Collage Paper".  This is double-sided and works very well for this type of project.  For this large box, I cut a piece of chipboard the same size as the bottom of the box and covered it in basic cream-colored cardstock to give some stability to the inside bottom of the box.  I used cream ribbon as a band and cut the puppy and "Yappy Easter" from an older cartridge - Paper Pups.  The tag was cut at 2 1/4 and the dog was cut at 3 3/4.  I used a bit of red satin ribbon to tie around his neck and popped him up.  The "Yappy Easter" was adhered flat to the top section.

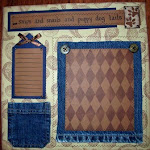
My son's "basket" is considerably smaller.  My mom always told me that good things go in small packages, so that's the theory behind his box.  :-)


This double-sided paper is from K&Company Wild Saffron.  I cut it at 5 3/4 and it came out rather small.  (Don't tell my son, but he'll get a Cadbury egg and some $$$).

I used the reverse side to make a band and then used my Martha Stewart button punch to make the button.  I used a Copic marker to color the button and then threaded floss through the button.  I used a pop dot for the button.  (Can I say "button" just one more time?  tee hee)  Gotta love it!


Want to see the difference in size??? I'm still learning how to use my camera, but here's a way to compare the sizes.


Remember, dog biscuits take up a lot of room so Doobie's box has to be bigger, right?  :)))

Hope you like them.  They were a lot of fun to make!  I see myself using this cartridge over and over.  Let me know what you think.  Love to read your comments!!!

Friday, March 16, 2012

A Cup of Joe . . .

In an attempt to make something worthy of the newest release from Emma's stamps, I thought I would make an 8 1/2 X 11 layout to showcase her newest release.  If you want to see them in their entirety, check out her shop at My Creative Time


I stamped the small backgrounds before I stamped the cups.  That way, I could make sure that I had enough of the background to cover the cups.  Then I used craft paper for the lids after I stamped the cups again and cut out only the lids.  This is called "piecing".  I used the die to cut out the cup and label in turquoise then pieced the other parts on top of it.  The turquoise background was inked with CTMH chocolate ink and I stamped the size (from the new release) on top of the label.

I took a scrap (again) for the dark brown background and randomly stamped the coffee cup, the coffee beans, and one of the phrases all over it and inked the edges in the same chocolate brown ink.  I cut one inch off the width and length of the red gingham paper and sewed it to the white cardstock.  I then inked the white cardstock and lightly stamped the coffee beans in each corner.

I cut a piece of craft cardstock (4 1/4 X 6 1/4) and adhered it to white cardstock for the mat.  I took that mat and used a piece of the same turquoise cardstock to make a third mat.  Before adhering the mat to the base, I took a piece of $1 ribbon from Michaels and ran it the length of the base and adhered it.

I used another stamp from Emma's former release (Cherish This Moment) to stamp a journaling box on white cardstock and matted it on the same turquoise cardstock.  I stamped title (from Emma's new release) and matted it on turquoise cardstock.

After everything was assembled, I put the page together.  The recipe is as follows:
*Stamps - "You Are Perk-fect", "Coffee Break", and "Cherish This Moment"
*Ink - CTMH chocolate
*Paper - craft, turquoise, white, and red gingham from Hobby Lobby
*Ribbon - $1 from Michaels

Hope you like it.  All comments are deeply appreciated.  Thanks for looking.  :)))

Sunday, March 4, 2012

Another one . . .

Hi guys!  I've posted some pictures of my covers for my Cricut and sewing machine, but I thought I'd share a picture of my Cuttlebug cover.  I made this to go with my other covers.  I had this embroidered at the same place that my other covers were embroidered.

I made a slit in the side with the handle and put grommets in the bottom of the slits.  I used a piece of sheer green ribbon threaded threw the grommets to tie it together.

Hope you like it!  Let me hear from you if you do.  Thanks for looking . . .


Friday, March 2, 2012

It's Birthday Time!!!

It's my son's birthday (Happy Birthday, Jay!).  Can you tell?  I wanted to make him a card so I decided to make a Cricut-less card and use this opportunity to enter it into Emma's challenge.  Isn't it cute???

He loves to travel so I tried to incorporate his love to see new places with a birthday card and voila!  He's getting a suitcase!  Don't ya just love it?


Recipe:
* polka dot 8 1/2 X 11 paper from the sale bin at Michaels
* cream 8 1/2 X 11 paper for printing sentiment and names of places
* scrap craft paper
* scrap red paper
* scrap brown paper
* scrap light green paper
* brown ink

I cut the polka dot paper in half to get an A2 size piece (4 1/4 by 5 1/2) and folded it.  I used my Corner Chomper to round the corners (1/4 size).  I cut two 1 inch pieces of brown scrap paper in half diagonally to get the corners.  I rounded those as well.  Then I cut brown strips 1/4 inch wide for the straps.  With the small piece of brown paper left, I cut a 1 inch round piece with my paper punch and then cut 3/4 inch from the round piece to form the handle.

I inked each piece separately and adhered all the pieces to the places.  Before I forget, I cut a slit in the top of the card so I could fit the "handle" into the suitcase.  I taped the bottom of the circle down on the bottom of the inside of the card because I planned to mat the sentiment and cover it up.

I printed and cut out the names of the destinations and double matted them on light green paper first, then red paper.  I also cut out a rectangle for Jay's name out of cream cardstock and hand-cut a tag to back his name.  I zig-zag stitched the two together and tied the tag to the handle of the suitcase.

After I printed the sentiment, I inked and matted it to red cardstock.  Then, I adhered it to the inside of the card.  I inked the entire outside of the card and set it out to dry.

I hope he likes it.  Do you?  Still using my scraps . . . gotta love it!