I can't express how excited I am that you found this site, this place - my place.
I hope you get a bit of enjoyment and a smile comes to your face when you read my posts and look at my work. Enjoy -

Monday, February 27, 2012

Happy Birthday Scraps

Can you tell that I'm on a mission?  I have a TON of scrap paper that I want to use and what better way than to make cards and scrapbook embellishments. 

Today, I'm sharing a card for a friend of my daughter.  I decided that I wanted to add a bit of stitching to it, so I ruffled 1 1/2 inch ribbon and attached it to the card.  Let me give you the recipe first . . .

*card base - scrap patterned paper (as usual, don't know the name) cut at an A2 size
*Cricut cut - number mesh cut at 5x3.75 (Art Philosophy) out of craft paper
*green with brown polka dots ribbon from Hobby Lobby
*scalloped circle (1 3/4 in.) out of craft paper
*circle (1 5/8) out of brown scrap paper (didn't have a big piece)
*circle (1 1/2) out of the reverse side of the card base paper
*CTMH ink in New England Ivy
*birthday stamp set from Creative Time's "All Around Birthdays" stamp set


I cut and folded the card base.  Then I used the reverse side to make a base for the number mesh.  After adhering the mesh to the mat base, I ruffled the ribbon and stitched it on the mesh.  Then I stitched the mat onto the card base.  It may seem like a lot of sewing, but it's really not.

When all the layers were set, I stamped the "Happy Birthday" on the round green piece and adhered that to the other layers for the medalion.  I used pop dots for the medalion in order to raise it above the ruffles of the ribbon.  Otherwise, it may get lost in the dimension of the ruffles.

I hope the recipent likes it.  Can you tell how old she'll be on her next birthday??? teehee

By the way, I took the picture in the laundry room and I think it turned out better than my other ones.  I don't have a light box and haven't gotten around to making one.  I'm beginning to think that I don't need to.  What do you think?

Thanks for looking.  I hope you get inspired and can take something from this to create your own masterpiece.  Gotta love it!  :)

Friday, February 24, 2012

Once again, it's about the scraps . . .

I thought I'd share a baby shower card I made for a friend of my daughter.  If you look closely, you'll notice a bit of sheen on the embellishment (baby bottle).  I tried something new . . . I sprayed the embellishment with polyurethane.  I thought I'd try to add some sheen, but it may have backfired.

Anyway, I'm sharing it so you can see the effects.  By the way, before anyone asks, I sprayed it it separately from the card.  In other words, it was not on the card when I sprayed it.  It was hard to get a good angle, but I'm showing it in two different views.

WARNING . . . I'm really into using up my scraps.  I have so many parts and pieces of beautiful papers that I feel the need to use them up.


Recipe:
*premade A2 card and envelope in offwhite
*once again, scrap paper in pink gingham, light pink, dark pink, pink polka dot, light tan, and light green (gotta love it!)
*green ribbon with pink polka dots from Hobby Lobby
*EK success border punch
*CTMH stamp pad in New England Ivy
*CTMH stamp pad in Watermelon for the inking around the edges
*sentiment stamp from My Creative Time (love it!)
*light pink and kiwi green stickles


I cut the baby bottle at 3 inches from the Baby Steps Cricut cartridge.  I cut the little flower on the front of the bottle twice because the cut was with the bottle ring and I wanted it in different colors.  Because I cut it twice, I had extra cuts that just HAD to be used.  Know what I mean??? 

Okay, so I used the extra cuts to make the little tulip that graces the inside of the card.  Isn't it cute?

Anyway . . . that's it.  I'm off to help my daughter with this baby shower.  I'll try to take pictures of some of the other decorations I made and show in another post.  Gotta love it!

Thanks for looking . . . and in the infamous words of a former governor, "I'll be back!"  teehee

Wednesday, February 15, 2012

Coverage . . .


Like it?  It's my Cricut cover.  I didn't use a premade pattern.  All I used was the mouse pad that came with my Design Studio purchase several years ago.  That formed the the pattern for the end pieces. 

Once I got that cut, I laid a piece of quited fabric over my Cricut to get an idea of how much I would need for the actual cover.  I then stitched the end pieces to the the cover piece, attached quilt binding all around the bottom, and  . . . Voila!  A Cricut cover.

Then, I took it to my local embroidery shop and had them put my initials in the center.  I REALLY like this font.  It's fun and creative. 

The initials are in lime green and the cover is a deep chocolate brown.  Btw, some of my cartridges are on a floating shelf in the background.  What you see on the right is a homemade ribbon spool.  I took a dowel, a wooden base, and drilled, glued, and painted them.  I use washers in between the spools of ribbon to help them turn easier when pulling off lengths of ribbon.  One of these days, I'll show you what I use to store large spools.  (It's in the closet.)

Hope you like it.  I'll be engaged in creative endeavors this weekend while connecting on a personal level with some peers.  In other words, I'm goin' scrappin'!!!  WOOHOO!  Gotta love it!

I'll be in touch.  See ya . . .

Saturday, February 11, 2012

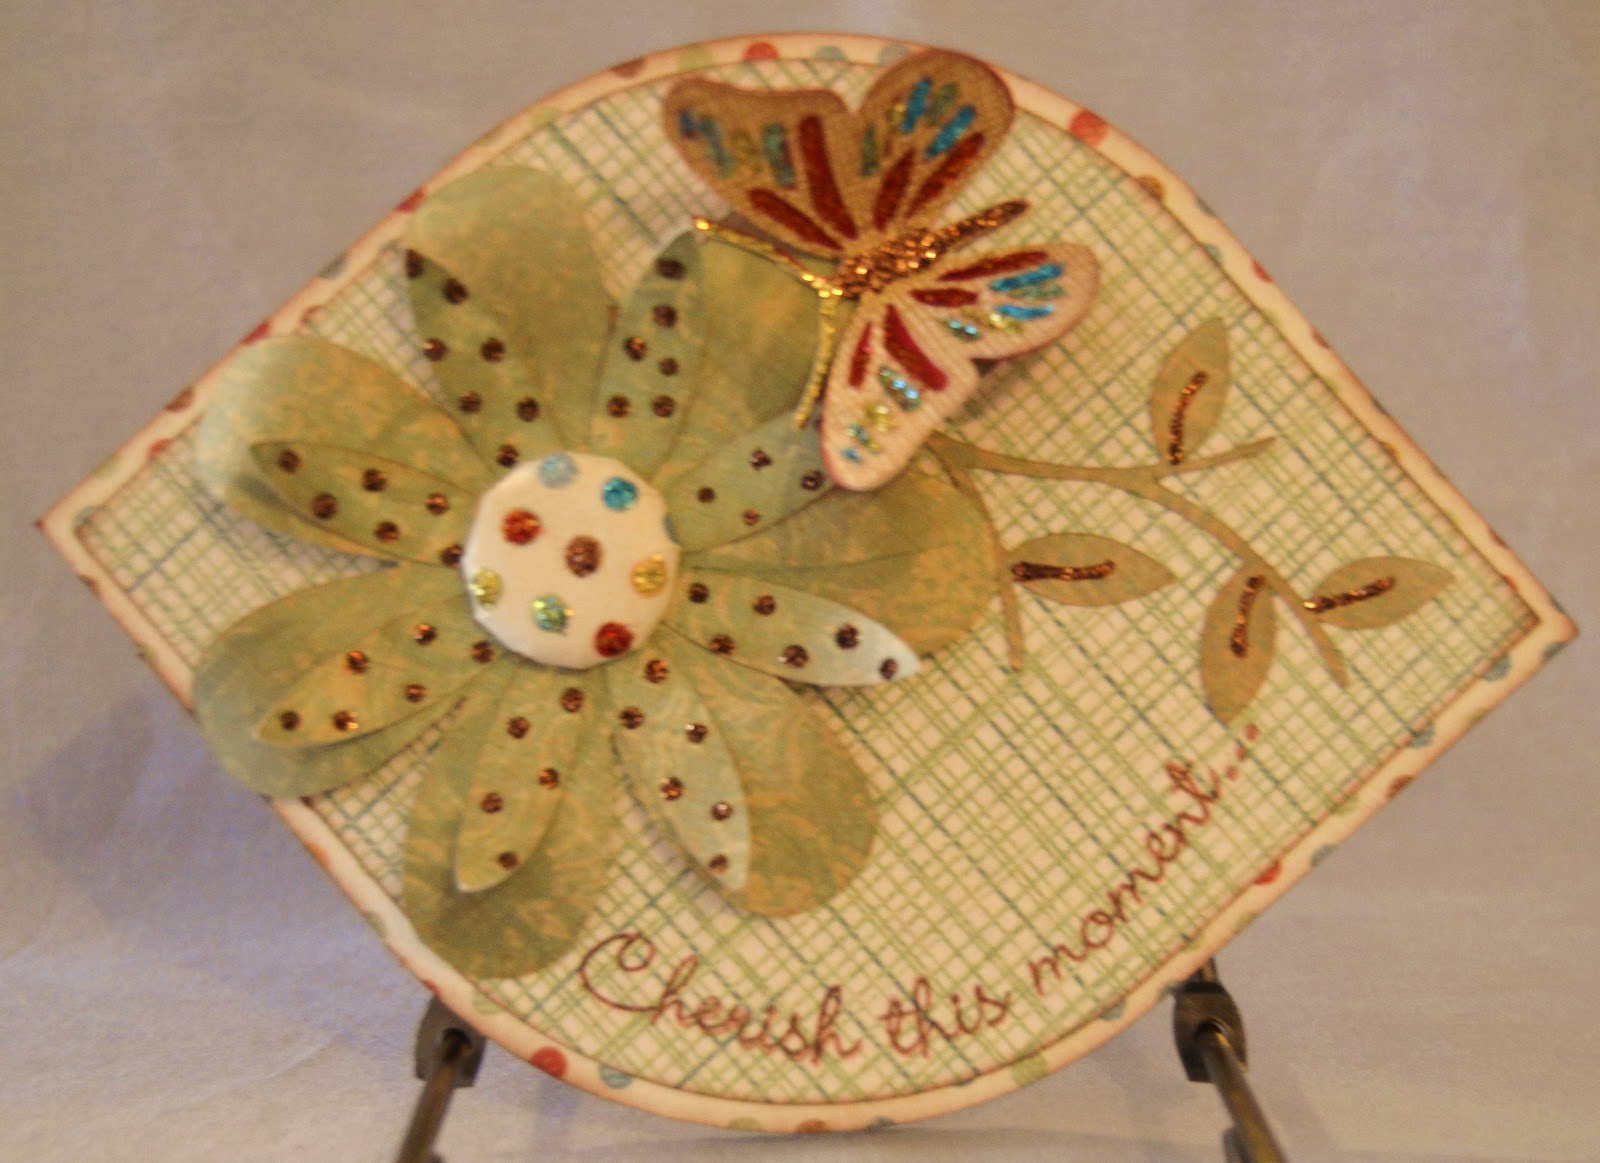
Cherish this moment . . .

Okay . . . so this time, I've made a card for a challenge organized by Emma on her blog at http://www.creativetimeforme.com/ The challenge was to make something with a bug on it. 

Well, my favorite bug (if there can be such a thing) is a ladybug.  They are cute, red, and ungross.  However, I don't want to "ladybug" myself out, so I thought I would try a butterfly.  I don't usually put butterflies on things because so many people use them, but I found the most beautiful butterfly shape I've seen on a Cricut cartridge, and it's on the Hannah Montana cartridge.  Who knew???


I need to apologize for the blurriness of the photo.  I can't seem to get my new camera operating to my expectations.  Could it possibly be the photographer?  I'll keep trying . . .  anyway . . .

The card shape and mat were cut at 5 inches and 4 3/4 inches respectively from my Art Philosophy cartridge. The card is cut from a multi-colored polka dot pattern (scrap paper) that is white on the back so the inside of the card is white.  I used a mat that's a green weave pattern for the cover (using up my scraps here).  I cut the butterfly out at 1 1/2 inches (using Coordinations cardstock) and the shadow (in a basic red) is the same size.  I inked the edges in dark brown and then I went Stickle crazy.  I used the same colors for my Stickles that are on the background paper.  The flowers and branch are also out of scrap paper (gotta love it!) and also came from the Art Philosophy cartridge.  I used Emma's "Cherish This Moment" stamp from her "Cherish This Moment" stamp set.  One of the cool things about her stamps (other than the quality) is the fact that you can curve them on your block.  Isn't that just the neatest thing?  I love it!  Next time, I'll use a darker brown for the stamp, but I think it still turned out beautifully.

Using up scrap paper . . . I have so many neat patterns and pieces that go so well together.  Unfortunately, I've cut the name off so I have no idea where or what the pattern is from.  Sorry . . .

I think this one is my favorite.  I really REALLY like the bling.  Hope you like it too. 

Ah-h-h-h-h . . . another project down.  Gotta love it!

Thanks for looking and I'll be around . . .  :)))

Thursday, February 9, 2012

So soon?

Yup . . . I'm back.  I started thinking about all those projects and things I'd made for weddings, peers, and stuff and thought I'd share.  After all, that's what this blog is about, right?

Anyway, when I finally got my own craft room, I decided that I wanted a way to keep dust out of a few of my prized crafting/sewing tools.  I had no pattern - just measured, cut, and stitched these up.  Then I took them to a local print and embroidery shop (Who Dey) for the embroidery.


On the right, I have a pocket for bias tape or whatever is in a fairly wide package.  On the left, I have a set of double pockets (taller) that are used to house my pinking shears and fabric scissors.  If you can tell, my pinking shears have a green handle to match the cover (love it!)

Anyway, the back right corner is finished, but not seamed.  I did that to allow the power cord freedom to come out from my machine without having to fold it and risk it coming unplugged.

I used brown bias tape to finish all the edges and the embroidery is in dark brown also.  While I'm not really the "matchy-matchy" kind of person, I do like the cohesiveness of the look.  It brings all the other covers into alignment and makes my craft space a bit more organized feeling.  Notice I said "feeling".  lol

I'll try to be back in the next week or so with another picture of the "organization" in my craft room.  Until then, I'll be around . . .

Wednesday, February 8, 2012

I'm back . . . . . . .

Yup . . . I know it's been a long time.  Yup, it's been awhile.  That's what happens when you have a daughter get engaged, plan a wedding, get married, and have to do it all over again for your brother.  I wouldn't trade it for the world!

Yup, it's been a long time.

Anyway, thought I'd share this little project that I did for a Peachy Keen Challenge.  It's made out of a toilet paper roll and other odds and ends.  Let me explain . . .

I took a toilet paper roll and made about six 1/2 inch cuts on both ends and folded the pieces into the roll.  I did that to shorten it a bit and to give it a more stable base.  Then I cut a piece of black harlequin scrapbook paper (had it a long time so not sure what kind but I think I got it from Hobby Lobby) and wrapped it around the roll.  I then made random cuts in the top piece to make the edges look raggedy.  Then I wrapped some baker's twine in red cherry several times around the top piece and tied it into a bow.  Next I cut a round piece of red cardstock and adhered it to the bottom.  Then I cut two hearts and their shadows from the Doodlecharms Cricut cartridge.  I flipped one of them and layered them on their shadows of red gingham paper. 

Now, the good part!  I used the Corny Faces stamp set from Peachy Keen Stamps to stamp the cute faces.  I just love the buck teeth!!!  Anyway, I added some pink chalk to the cheeks and the edges of the white hearts, added faux stitching, and popped them up.  Voila!

Isn't it cute?!  I could use this to give Valentine goodies to special people or just sit it on my shelf and look at it.  Ahhh . . . creativity . . . don't ya just love it?

Saturday, September 18, 2010

Check it out . . .

First of all, a big "Thanks!" goes out to Diane of Capadia Designs (click http://capadiadesigns.blogspot.com/ to check out her blog).  She has given us a site that references the designs on all the Cricut cartridges.  If you use a Cricut at all, you know how confusing and difficult it can be to find a particular cut, especially if you have tons of cartridges!  This site should help those of us who have one or two cartridges be able to find an obscure design needed for a layout or card.

They're still new and want feedback, so check them out (http://www.cricutsearch.com/) and let them know what you think.  Personally, I'm looking forward to the help!

Have a good weekend, and I'll be in touch.

Sunday, September 12, 2010

The Beautiful Gulf of Mexico . . .

A different type of sea urchin
Angelfish
Hightop
A baby angelfish

Just thought I'd share some of the pictures from a very recent dive trip in the Gulf of Mexico.  I've never claimed to be a good photographer, but some of these turned out to be fairly good shots. I'll try to label them as I post them.  Enjoy -

Saturday, September 11, 2010

It's been awhile . . .

Yes, it's been a long time since I posted.  No, I haven't fallen off the face of the earth.  Yes, I'm still paper crafting and enjoying every bit of it!  I'm currently working on something called "5 Pictures, 5 Pages".  Diana came up with this idea in order to get new ideas infused into our scrapping.  Five people share 5 pictures with 5 people who then scrap the pictures on an 8X8 layout.  The whole idea is to get different styles and ideas for our scrapbooks.  It's truly an ingenious idea because the book is unique and special without being repetitive. 

As soon as I finish my 5 pages, I promise I'll share.  In the meantime, I'm off to go on one last dive before the water cools off too much. 

See ya!

Monday, August 16, 2010

Need a long Gypsy cord?

A good friend of mine (thanks Maggi) gave this to me not too long ago.  I didn't realize how much something like this was needed until I plugged mine in for the first time,  No more craning my neck, twisting my back, moving my Expression, or stretching to keep my Gypsy connected to my E.  This extension cable has been a true treasure!

Check out this link to find out where and how much.  They're reasonably priced and truly a needed item.  Don't forget to check out the new updates and cartridges being released also this week (I think).  They're supposed to be very special holiday solutions cartridges. 

See ya -

Tuesday, July 27, 2010

Today's Dive

I went diving today on a local wreck in the Gulf of Mexico.  We didn't know what to expect with the oil or how the visibility would be.  Happily, the seas were a rolling 1-2 foot seas with very little (if any) breeze. 

We anchored and set about the business of donning our gear.  After stopping several times to pour ice cold water down our wetsuits (did I say it was hot?), we got into the water.  The top water temperature was about 86 degrees.  We started down and hit a thermocline (a place where the water temperature changes and you see fuzzy water like the fuzzy look on a hot road) at 55 feet.  With the top water temperature being so hot and the air temperature being scorching (oh yeah, I told you it was hot), the cooler water of the thermocline felt great!

Two remora followed us down the anchor line.  A small one was attached to the larger one which was trying to attach itself to my dive buddy.  I guess my gosh-awful-flourescent-yellow dive gear was too much for the remora so they decided to annoy my dive bud.  It didn't work, though.

Anyway, we hit another thermocline on the bottom.  The visibility was about 40 feet with current only on the bottom.  We saw butterfly fish, gobies, spade fish, amberjack, blue angelfish, goliath grouper, and a bait ball that had the amberjack going crazy!  Little tiny scales floated down and lit the water like an underwater disco ball.

The picture at the top is one of the butterfly fish couples we saw.  And before anyone asks, no, we didn't see any sharks.

We're told that the oil slick is moving to the west and breaking up.  We didn't see any evidence of the oil, but we saw lots of oil slick boats and boom. 

Saturday, July 24, 2010

Time keeps on tickin' . . .

Yes, I realize that it's been a long time since I posted, but there is that thing called "life" that tends to get in the way of living.

Anyway, I've been down to the Florida Keys for a short visit and thoroughly enjoyed it!  I went to a bird sanctuary, road an airboat, biked in the Everglades, and saw tons of gators - some of them guarding their nests!  It reminded me of the vast world around us and our need to protect our environment.  I tried to dive with my buddies, but the 4-6 foot waves became 6-8 and diving came to an end.  The first dive had us swaying with the surge underwater which showed us that a second dive would be a bad idea.  We were right.  On the second dive, four of our divers were plucked from the water by a different dive boat and a diver from yet another dive boat was swept five miles out to sea.  Boy, am I thankful that none of those eight footers took our divers from our dive boat out to sea!  The diver was rescued and God is truly good . . .

I've also begun the process of ending my summer (sigh . . .) and gearing up for the inevitable in the fall.  My posts will happen when living occurs and life doesn't get in the way.  I'll try to post when I can be creative, but that may be few and far between.  Thanks for your understanding.

I'll be in touch, so you be in touch.  :-D

Monday, July 5, 2010

Black and White Card

This is a sympathy/concern card made for a card swap at my church.  Unfortunately, there always seems to be a need for this type of card.  I made this using the Victoria embossing Cuttlebug folder on the white background while using a black and white flocked cardstock to add even more texture to the front.

On the inside, I put a white piece of cardstock in order to have a handwritten note, and I cut a strip of the flocked cardstock to give it weight and to connect it to the front.  The sentiment on the outside is from a generic stamp that if found at Hobby Lobby.  I've had it for a long time or I would give the name of the stamp brand.
:-)

The label for the outside sentiment is cut twice - once in white and once on black.  I cut the sentiment labels from a cricut cartridge that I can't remember the name of.  I made this card several months ago and I didn't record the cartridge I used.  Truthfully, I never thought anyone else would see it. lol

Anyway, I hope you like it.  I was an easy card to make.

Tuesday, June 29, 2010

Ribbon, ribbon, everywhere!

I just saw this question on Tammy's blog at http://www.cricutcritters.com/ and thought I'd show you what I use.

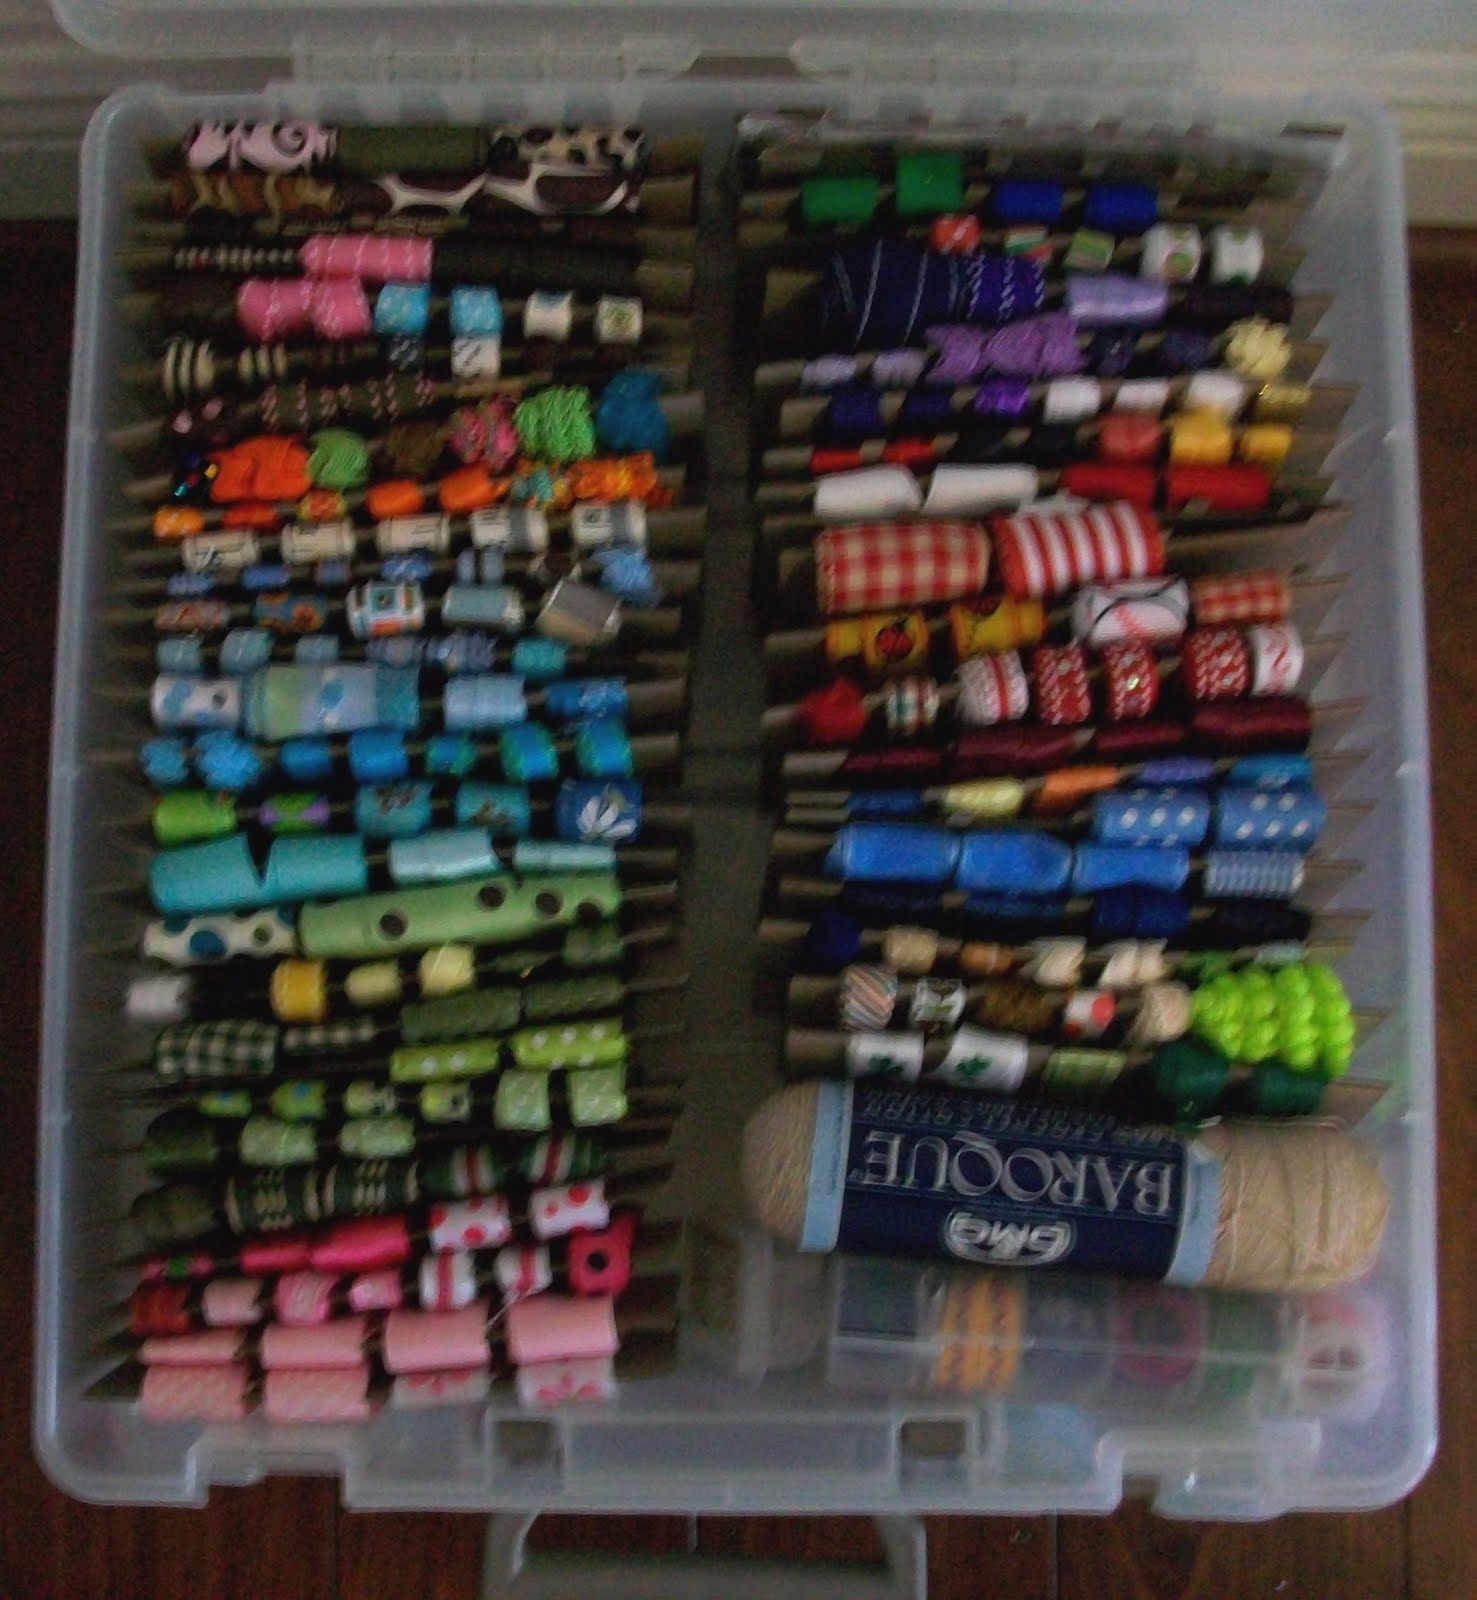
I use an Artbin holder with handles that latches shut to store my ribbon.  These ribbon wraps are from magistical memories and the neat thing about them is that they're portable and organized.  I can take this holder on crops or store it with my other scrapbooking supplies.  Check out the picture above -

As you can see, I have all my ribbon organized by color.  It makes it so much easier to match colors and find the appropriate size.  The ribbons are secured by tiny straight pins that I picked up from Michaels.


Remember, look in my archives under "Organization Stuff" to find the details.  If you need more info, let me know and I'll try to email you.

Aren't they the coolest ever???  ;-D

Monday, June 28, 2010

Belated Birthday Greetings


Hi guys - This card was made for a card swap in August. I decided that I wanted to do something a little bit different and use a cartridge that's not often used or acknowledged.  This cartridge is as cute as it can be and has lots of appropriate sayings for all sorts of occasions.

I took the frame feature on Paper Pups and used the hide contour feature to hide all the cuts on the inside.  Then I copied and flipped the copy in order to weld the two sides together.  All the designs were made to fit a 5X5 card and envelope. I did all my design on DS because Gypsy didn't have the option of hiding contours at the time.

I added another page and put the shadow for the cut on the next page. I added all the shadows that I could fit on the page (one of the glories of DS and gypsy) in order to get a set of 10.

Finally, I cut the outline on another page.  Before cutting, I outlined the cut with markers and then cut the outline.  I don't have anything fancy to do this with.  I used the Cricut markers that fit into the housing.  I used brown to do the outline.  I then filled in the eyes and nose with the same brown marker.  Using a red sparkly gel pen, I filled in the mouth because I wanted it to look like the dog's tongue.

I typed the inside on my computer and added paw prints from clip art. I got six on a page and matted it with a paw print paper.

By the way, the bone was cut from Paper Pups also and the sentiment on it was hand written.  Enjoy - :-D